
Website Personalization
1. Add the JavaScript SDK code to the website
For more information, read this JavaScript SDK guide.
You can use one of the following two options:
- Activate the Website Personalization module.
- Add or edit any website personalization campaign in the campaign manager: a recommendation widget, a pop-up, or an embedded form.
Once you finish, the website personalization tracker will be added to the website within the next two hours. To decrease this time to 1 hour, use the following keyboard shortcuts on your website: CTRL+F5 or CMD+SHIFT+R.
To check whether the personalization code is available on the website, enter "PopMechanic" in the console.
If the system returns "initializedByMindbox: true", the personalization code has been added to the website.

You can also see the unique project ID in the "client" field in this response string.
2. Add API methods to track website visits
There are three integration options available for three different cases:
- The data on page and category views is not yet being submitted to Maestra;
- The data on page and category views is being submitted to Maestra from the front-end system of the website using Maestra’s JavaScript SDK;
- The data on page and category views is being submitted to Maestra from the back-end system of the website or from an external system.
Select the best integration option for your current situation and use only this option.
2.1. Data on page and category views is not yet being submitted to Maestra
Go to the front-end system of the website, open relevant product and category pages, and run Maestra’s JavaScript SDK to call the operation via one of the following paths:
- Product → View: to submit the data on product web page views. Learn more
- Product → View category: to submit the data on category web page views. Learn more
This way, the system will submit the product and category view actions to Maestra. You can use these actions for personalization campaign targeting.
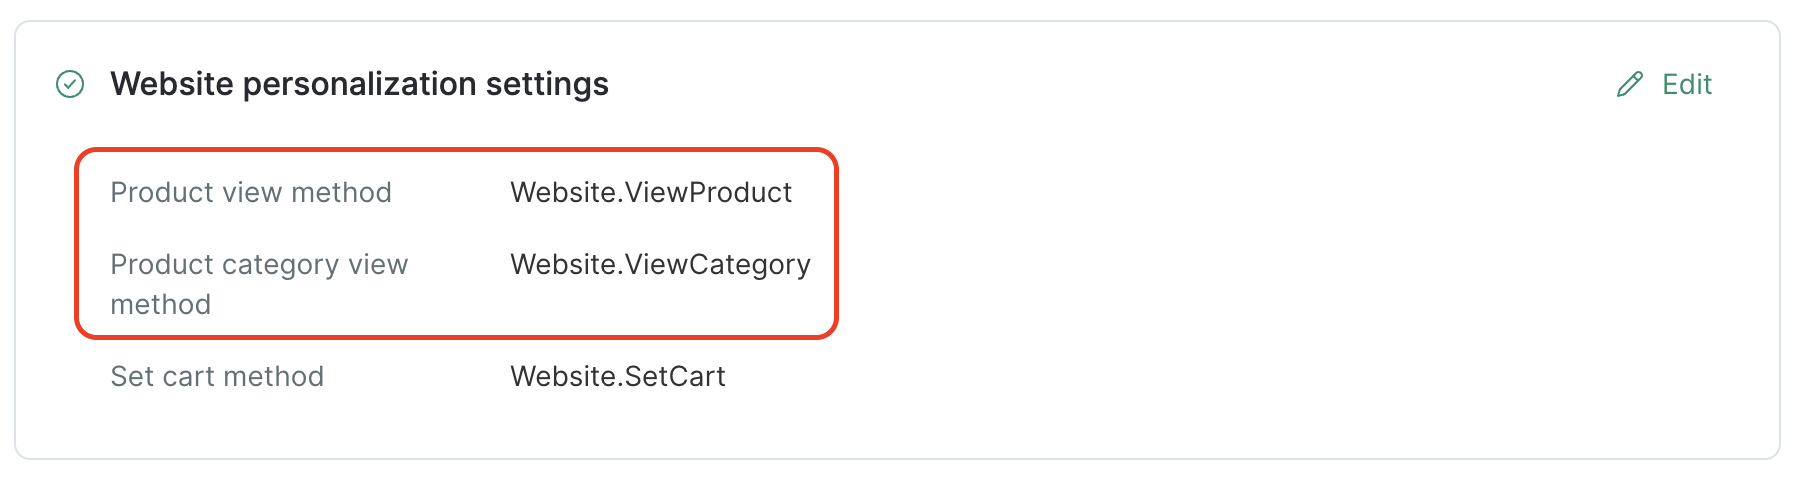
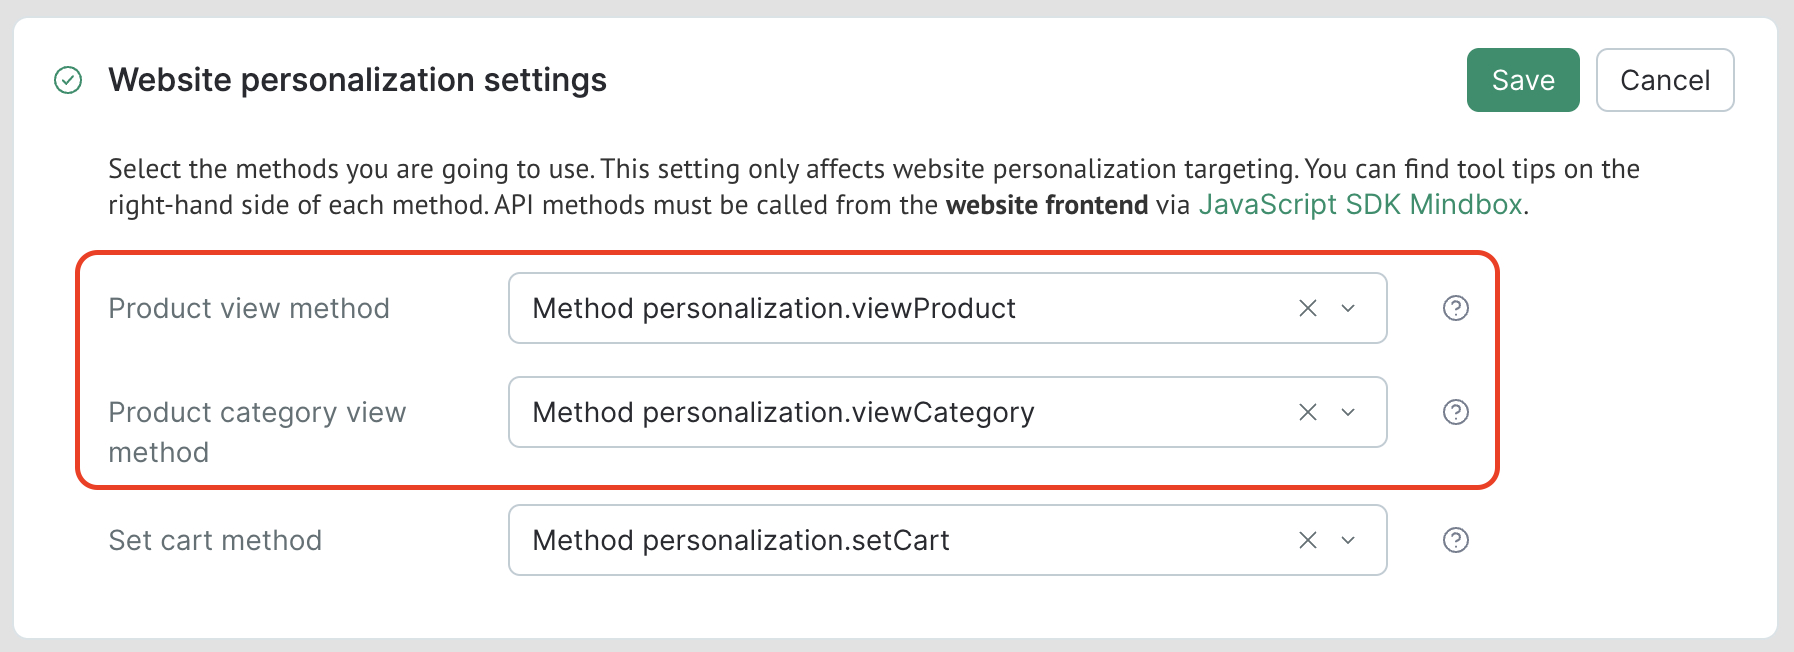
Go to API endpoint settings and select the methods that handle product and category views:
2.2. The data on page and category views is being submitted to Maestra from the front-end system of the website using Maestra’s JavaScript SDK
Go to API endpoint settings and simply select the methods that handle product and category views:

2.3. The data on page and category views is being submitted to Maestra from the back-end system of the website or from an external system
If you follow this integration option, you do not have to add new methods.
To use product and category views for targeting without duplicating these actions in the system, call the following methods in your tracker:
For product views:
maestra("personalization.viewProduct", {
  data: {
    viewProduct: {
      product: {
      	ids: {
        	"<ID>": "<Product ID>"
      	}
    	}
    }
  }
});
For category views:
maestra("personalization.viewCategory", {
  data: {
    viewProductCategory: {
      productCategory: {
      	ids: {
        	"<ID>": "<Product ID>"
      	}
    	}
    }
  }
});
Open the integration settings and select the personalization.viewProduct and personalization.viewCategory methods to view products and categories:
Once you do this, page and category views will not be submitted, but you will be able to set up personalization campaign targeting.
How to check integrations for each of the three variants
Call the command below from the web browser console to check that your data is being transmitted correctly:
maestra("personalization.invokeWithPageData", pd => console.log(pd));
The response will show the web page type: a product or category and its ID. Should the data you see mismatch the data displayed to a user in the front-end system of the website, check your integration settings.
3. Add cart tracking methods
There are three integration options available for three different cases:
- The data on cart contents is not yet being submitted to Maestra;
- The data on cart contents is being submitted to Maestra from the front-end system of the website using Maestra’s JavaScript SDK;
- The data on cart contents is being submitted to Maestra from the back-end system of the website or from an external system.
Select one fitting integration option and use only this option.
3.1. The data on cart contents is not yet being submitted to Maestra
When items are added to or deleted from a cart, go to the front-end system of the website and run Maestra’s JavaScript SDK to call the operation along the following path: Product → Set list (Learn more) to submit the current cart contents.
Once you do this, the system will transmit the cart contents to Maestra. You can use the contents for personalized campaign targeting.
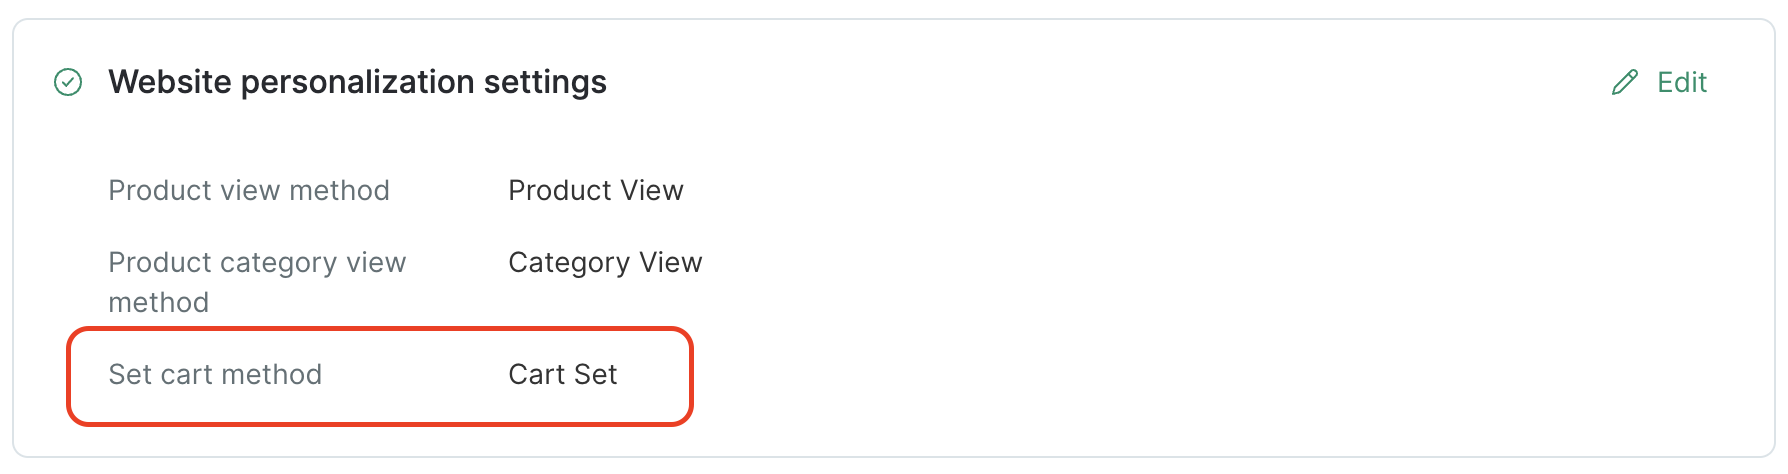
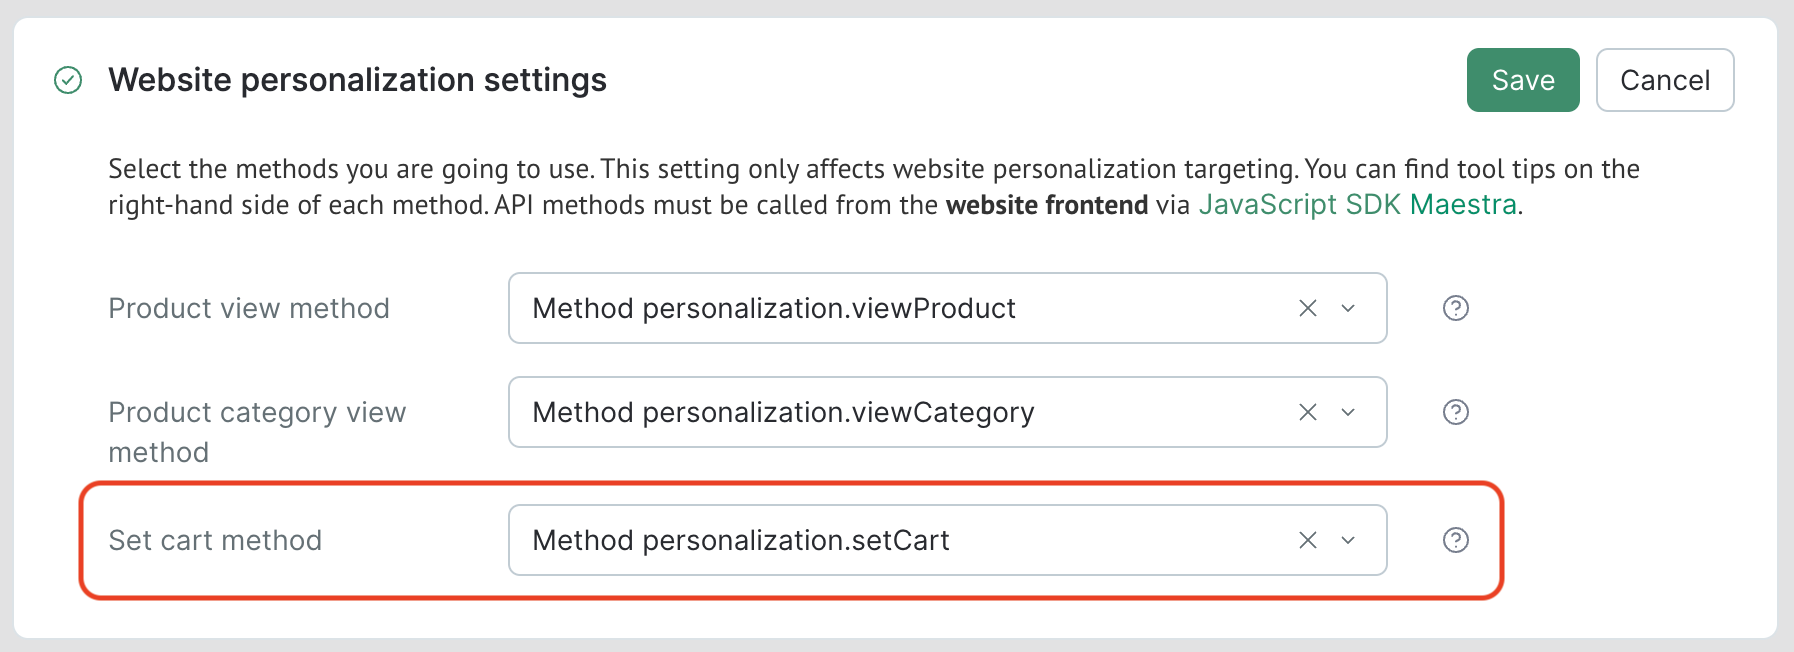
Open the integration settings and select the method that handles cart contents:
3.2. The data on cart contents is being submitted to Maestra from the front-end system of the website using Maestra’s JavaScript SDK
Go to the integration settings and select the operation that handles cart contents:

3.3. The data on cart contents is being submitted to Maestra from the back-end system of the website or from an external system
If you use this integration option, you do not have to add new methods.
To be able to use the data on cart contents for targeting and avoid duplicating the actions in the system, call the following method in the tracker with the current cart contents whenever they are changed:
maestra("personalization.setCart", {
    data: {
        productList: [
            {
                product: {
                    ids: {
                      	<ID>: '<Product ID>'
                    }
                },
                customFields: {
                  	<ID>: '<Custom field ID>'
                },
                count: <Quantity of items>,
                pricePerItem: <Price per item>,
                priceOfLine: <Price of line>
            }
        ]
    }
});
To set the cart contents, open integration settings and select the personalization.setCart method:
Once you do that, cart contents actions will not be transmitted to the system, but you will be able to set up personalized campaign targeting.
How to check integrations for each of the three variants
Call the following command in the browser console to check that your data is being transmitted correctly:
maestra("personalization.invokeWithPageData", pd => console.log(pd));
The response will show the cart: array containing the cart contents used for targeting. Should the data you see mismatch the data displayed to a user in the front-end system of the website, please check your integration settings.
4. Set up recommendation widgets and embedded forms
To display an embedded form or a recommendation widget, place a
<div data-popmechanic-embed="{Your ID}"></div>
You can set up Product-based or Category-based recommendations without transmitting a data-popmechanic-argument parameter if:
- Product and category view methods are up-to-date and can be called from the front-end system of the website using the JavaScript SDK.
- Webpage tracking methods are set as described in section 2.3 above.
<div data-popmechanic-embed="{Your ID}" data-popmechanic-argument="{Product ID}"></div>
<div data-popmechanic-embed="{Your ID}" data-popmechanic-argument="{Category ID}"></div>
<div data-popmechanic-embed="{Your ID}"></div>
<div data-popmechanic-embed="{Your ID}"></div>
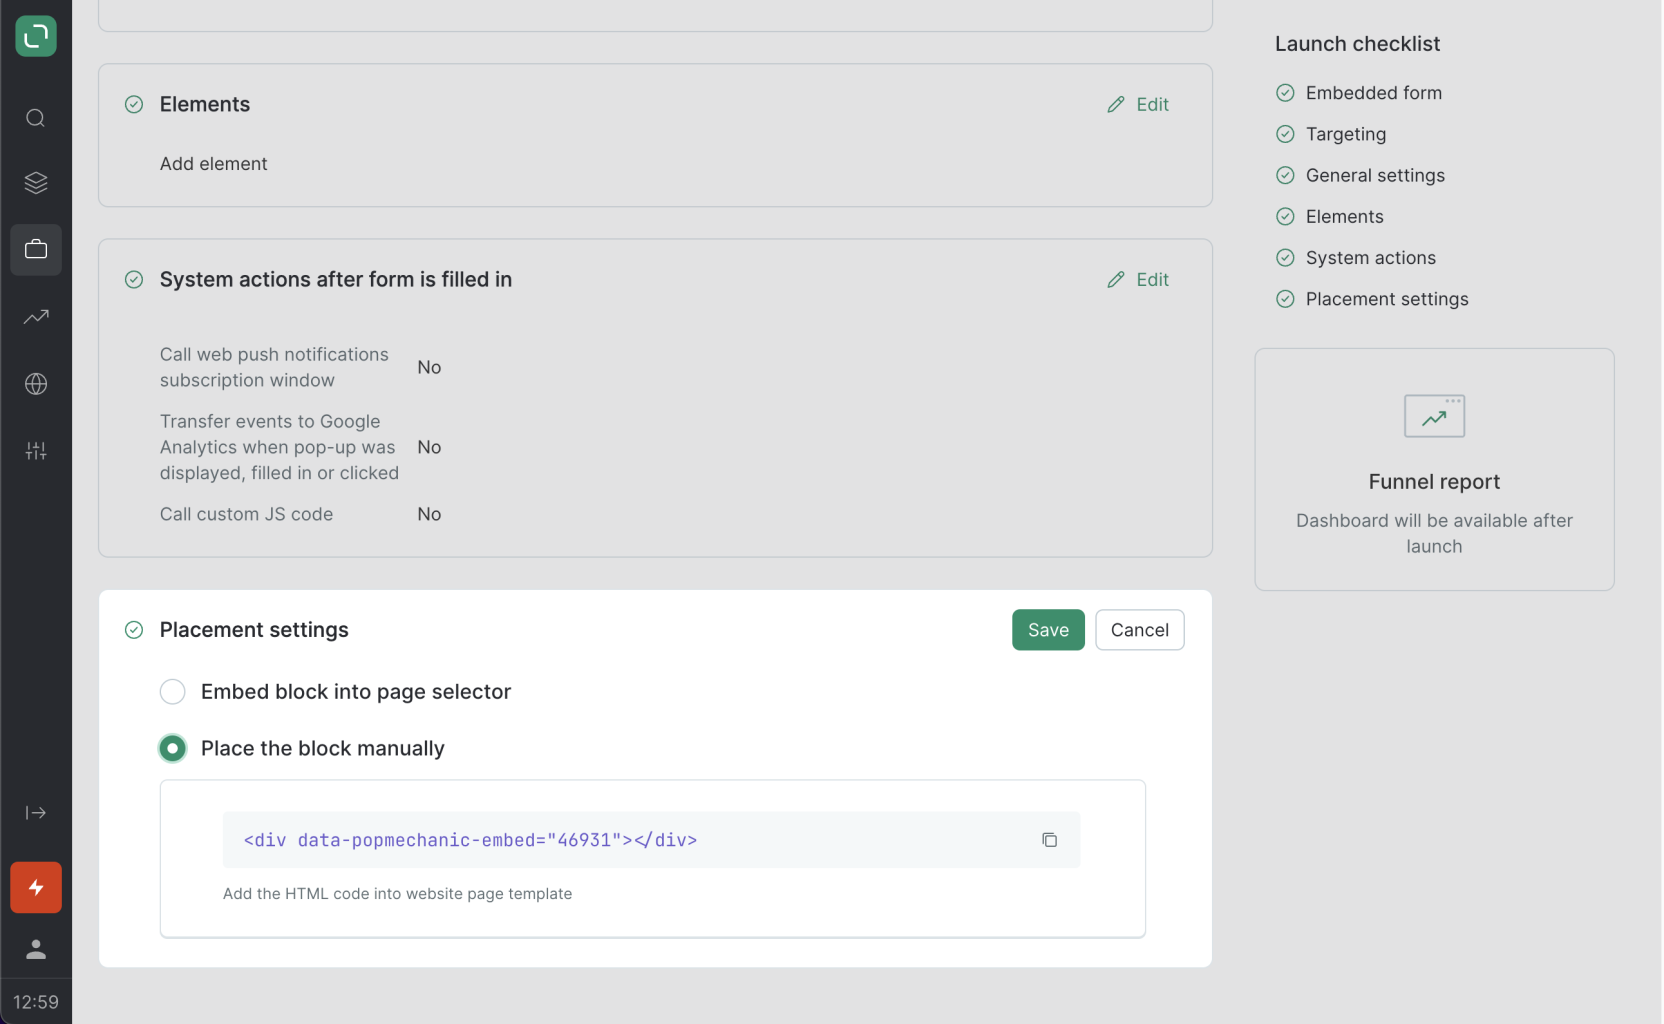
5. How to retrieve the code of a recommendation widget or an embedded form
To retrieve the code of a widget or an embedded form, open the relevant campaign, find the Placement settings section and copy the code:
For SPAs (websites updating pages without reloading)
Place the following tag before Maestra’s tracker:
<script>
window.PopMechanic = { watchLocation: false; }
</script>
Once a new web page is open, call the following code in JS:
window.PopMechanic && window.PopMechanic.update && window.PopMechanic.update()